
**Update 9/26/2014**
*********************************
Love the video above. And Brian's plans to make your own button are "Brilliant". But we found a WAY easier way to make your own buzz in system. More info here GamesShow Buzzer V2
*********************************
Here is how we make our Game Show Buzzers. They are cheap, easy to build, and very durable. These are made to work with a MakeyMakey (connect one wire to ground, and one wire to the key you want to activate on press) These buzzers work great with the Family Feud and 8ColorBuzzer apps. Parts for 1 buzzer: 1 - 2" x 3" Floor Drain (cheaper alturnative = 2"-3" PVC reducer pipe) 1 - 2" PVC End Cap 1 - 3" PVC End Cap 1 - 2" PVC pipe (less than 1 ft) 1 - 1" foam (found at most fabric stores) 2 - alligator clips 1 - sheet of tin (found at most hobby/craft stores) Construction: 1. Choose a base plate. I prefer the Floor Drain but the Reducer Pipe is a cheaper (but taller) alternative.

2. Assemble base. To your selected base plate, add a 2" PVC end cap. (use 2" pipe to connect)

3. Make Foam Donut. - Use your smaller end cap to determine the size of your foam do-nut.

- An electric knife makes cutting a foam circle much easier.

- A nice pretty donut. Now put that to the side, we will get back to that in a bit.

4. Make metal connectors. These are the parts that will need to touch to complete the MakeyMakey circuit. - We found Tin to be a much cheaper alternative to copper sheets.

- We found a bundle of 10 alligator clips at the hardware store. They work great when connecting stuff to a MakeyMakey. 
- Cut the tin into strips. - Cut off one clip of the alligator clips. - Solder the end of the wire you just trimmed onto the tin strip. (or glue if soldering is not an option--just make sure there is a good metal to metal connection) - Bend the tin strip to conform to the curve of the end cap.

- Hot glue to secure in place.

- Look at that pretty soldering job (I hot glue everything in place because of the abuse this thing is gonna take) 
- Now we are ready to glue the Foam Donut on top of the tin strip.

- Next place the second strip on top of the Foam Donut, and glue in place.

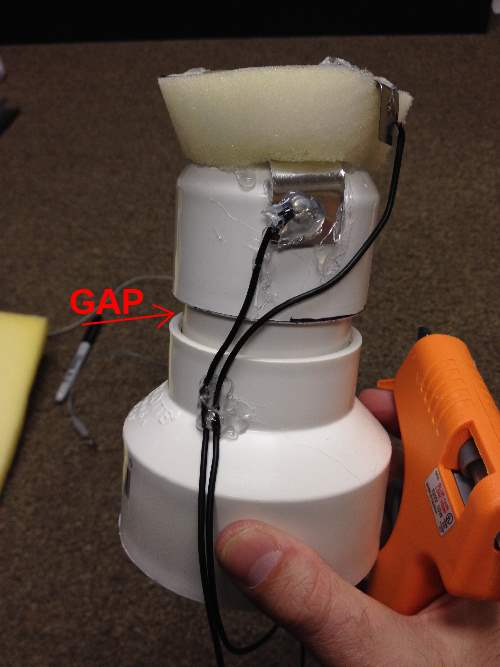
OK, lets look at what we go so far. - The base looks ok, but this gap means our connecting pipe was too long. I should have trimmed my pipe down so the 2" end cap touches the base plate. - The 2 tin strips are aligned so when the buzzer is pressed they will meet. - I hot glued the wires in place to keep them in control. - You can't see it in this picture, but on the other end of these wires are aligator clips. They can clip directly to the MakeyMakey.
5. Final Assembly - Now all I have to do is slide on the 3" End Cap (no glue needed)

6. Final Product - Here in the side by side comparison so you can see the difference in the 2 base options. - The floor drain on the right is my favorite. But if your making 8 buzzers the cheaper option may be the way to go.
